
Toadstools Sampler - Free Embroidery Pattern
Some of you might remember this design being released as part of a set that included a blackwork toadstools pattern as well… keep your eyes peeled for that! It may well also make an appearance here soon
For now though its time for another embroidery design! This one is perfect for beginners and beyond, with lots of stitches to have fun trying out

Before you Start stitching
This patterns is great for beginners and beyond! Video tutorials for the different stitches are linked throughout the pattern
Materials List:
A 5 inch embroidery hoop
Cotton/linen fabric to fit (I prefer a medium to heavyweight cotton blend for my embroidery. You can use whatever you are most comfortable with)
An embroidery needle
An erasable pen or pencil to transfer the pattern to the fabric. (Pilot frixion pens are good, they are heat erasable but can leave residue on some fabrics so be sure to check on a scrap piece before using them)
A printer to print out the pattern transfer OR a tablet to use a light box to trace your transfer (instructions below)
Threads as detailed in the numbered list. The threads will be referred to as their number throughout the pattern i.e. thread 351 will be referred to as thread 1
DMC Threads:
Thread 1 - 816,
Thread 2 - 304,
Thread 3 - 612,
Thread 4 - 3866,
Thread 5 - 3822,
Thread 6 - 581,
Thread 7 - 937
Transferring your pattern to the fabric:
To trace the embroidery pattern from a tablet:
Download the embroidery pattern to your tablet making sure that the screen is the same size or bigger than your embroidery hoop
Place the fabric in the embroidery hoop and pull tight (this will make it easier to trace)
Make sure that the pattern is displayed at the right size for the embroidery hoop, turn up the screen brightness to full and place the fabric in the embroidery hoop over the screen so that the pattern can be seen centrally through it
Trace your pattern using an erasable pen or pencil
Top tip: Just trace the outlines, don’t worry about the numbers for now as you can refer back to the pattern for these as you stitch
To trace the embroidery pattern on to your fabric using a printed pattern:
Download and print the embroidery pattern on A4 paper (or equivaent). It will print the correct size for a 6 inch embroidery hoop
Put the cotton fabric in your embroidery hoop and stretch it tight
Place the printed pattern on a flat surface and the cotton fabric in the hoop on top so that the pattern is central in the hoop
You can now trace the embroidery pattern on to your fabric using an erasable pen or pencil
Top tip: try taping the embroidery pattern to window to trace, as the light coming from behind will make it easier to see the lines
To print the embroidery pattern on to your cotton fabric:
Download the embroidery pattern
Take a full page A4 printer label and stick it to your fabric making sure there are no creases in the fabric
Cut around the label as accurately as you can
Place the label and fabric in an inkjet printer, use the rear tray if you can as this will be an easier path for it
Print the embroidery pattern on to the fabric
Remove the label and place the fabric in your embroidery hoop
Please note that this method can leave small amounts of ‘fluff’ in your printer. I have printed 100s of pieces of fabric like this and have had no problems but use this method at your own printers risk!
The Colour Placement Diagram
Refer to this throughout for where to use each thread colour
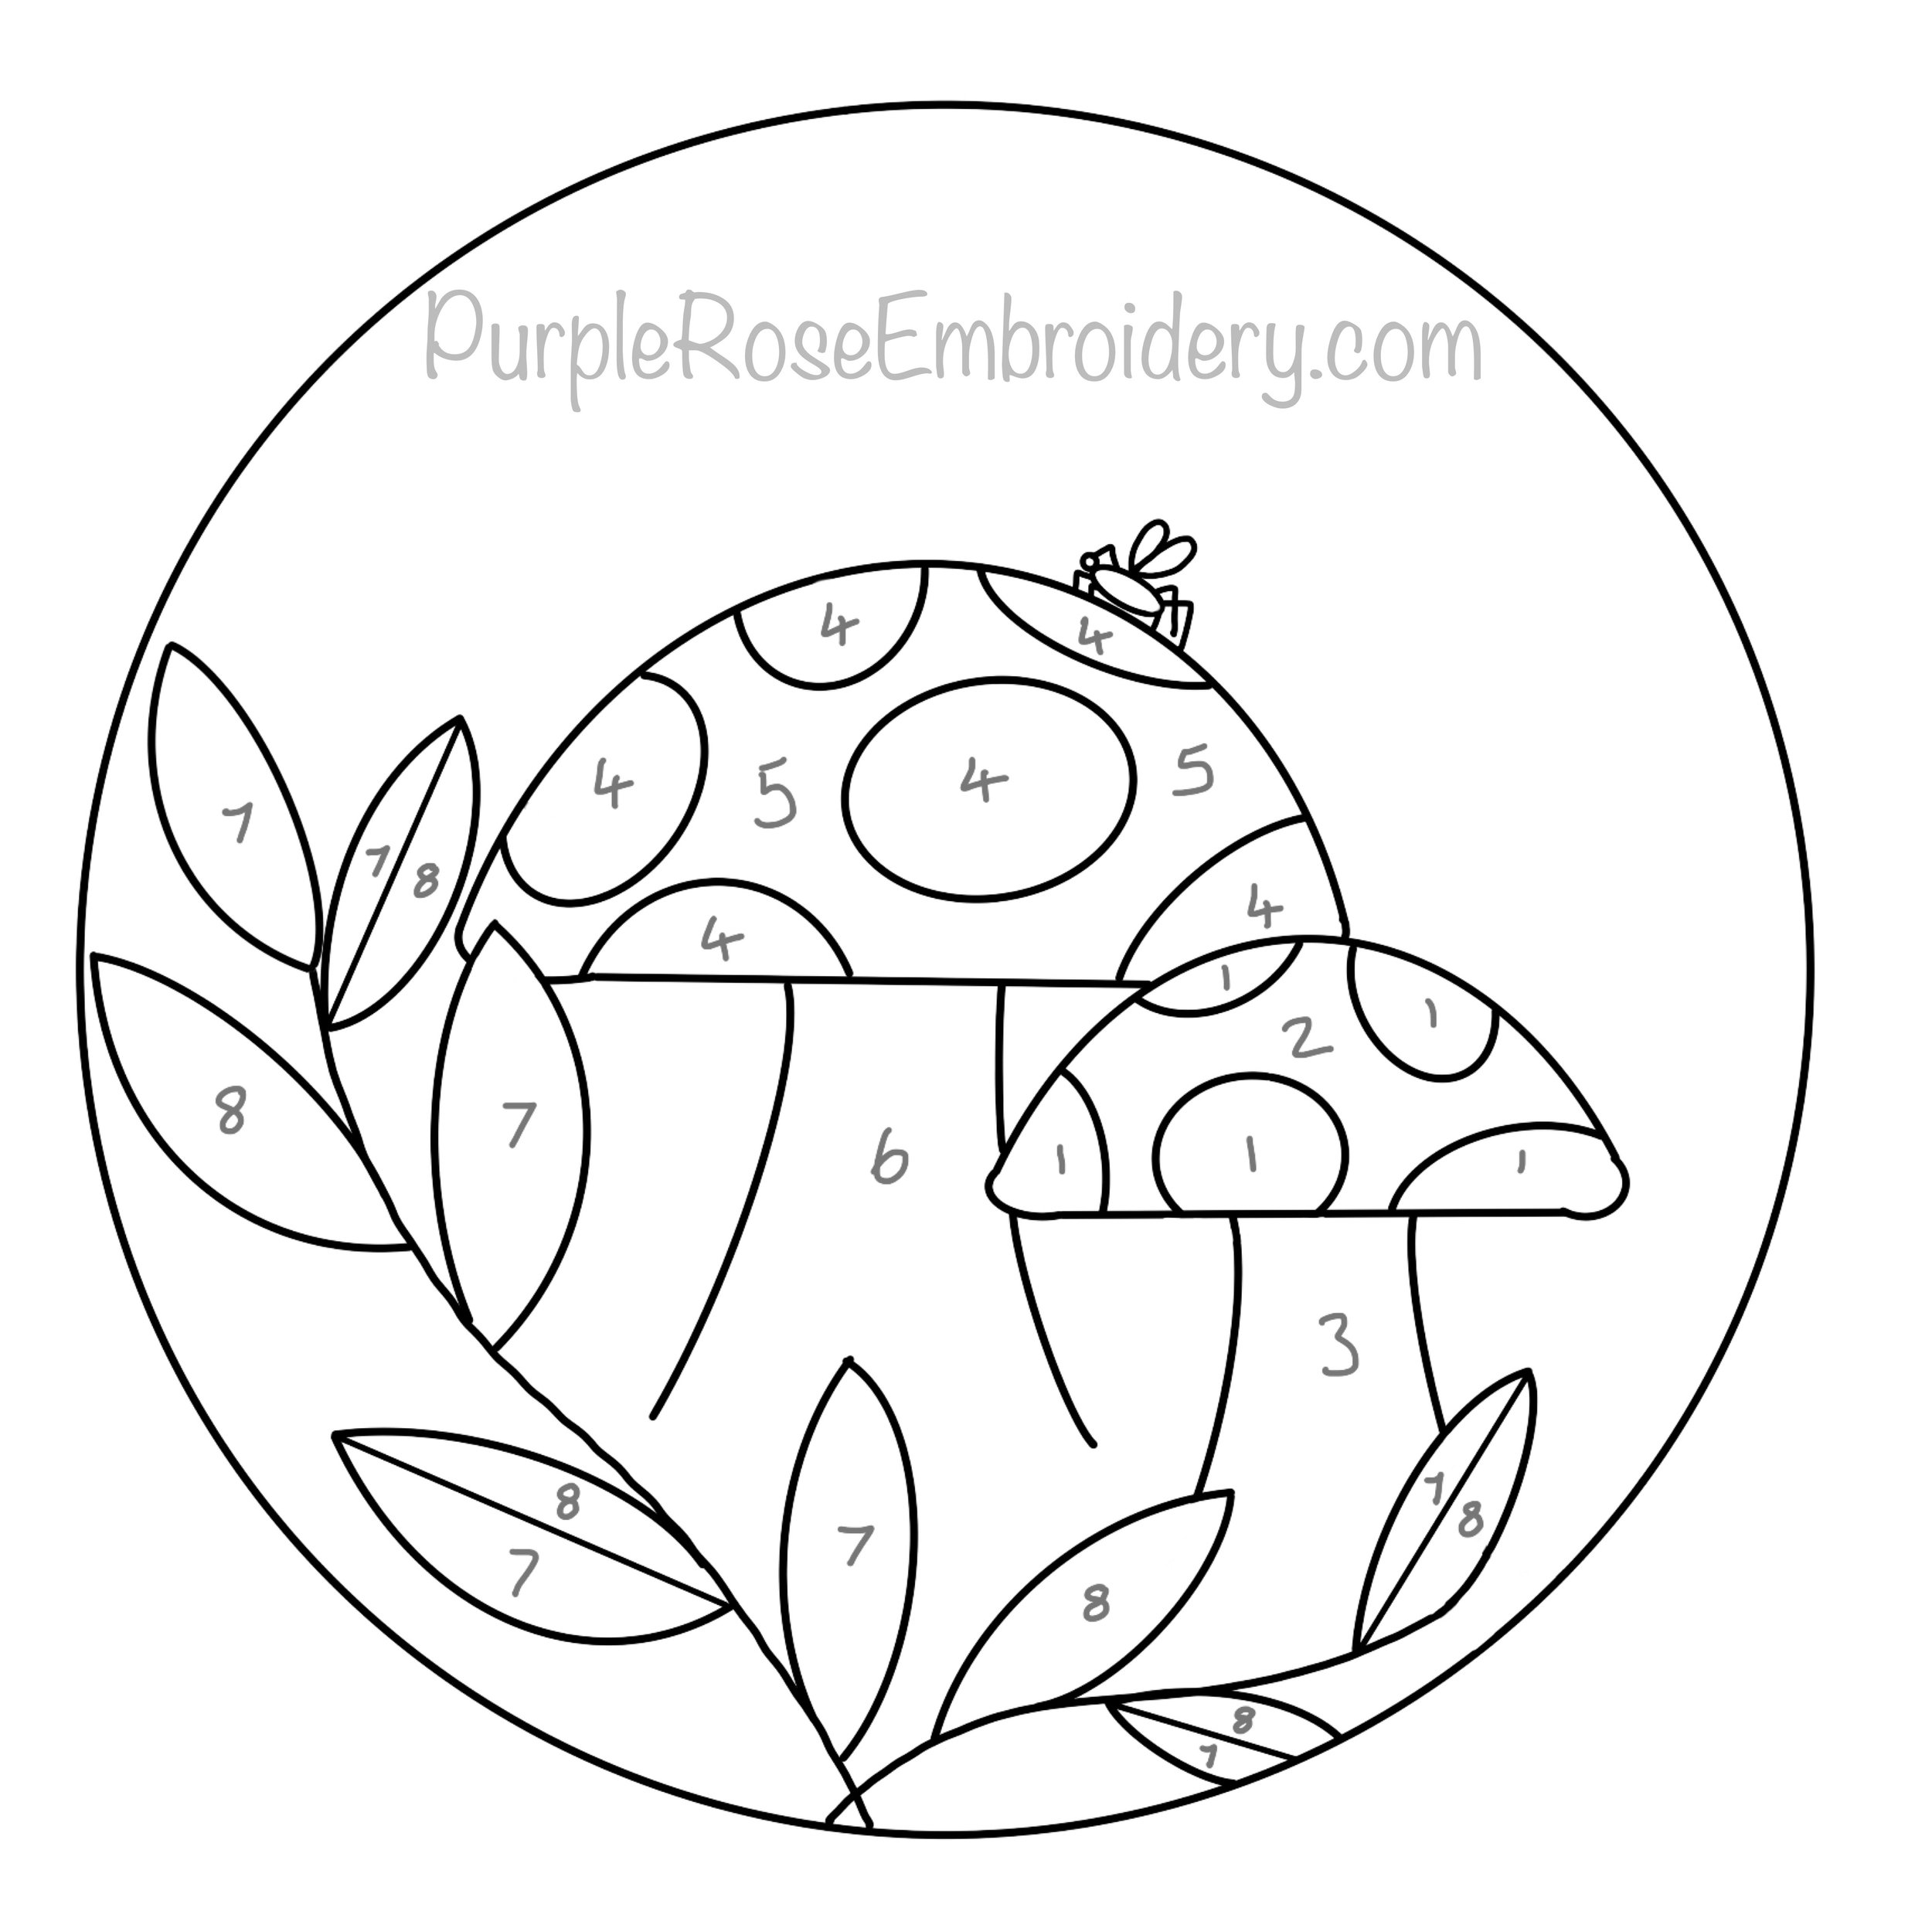
Let’s Get Stitching!
The Small Toadstool
Step one: Using 2 strands of thread 5, fill the areas marked with 1 with French Knots
Step two: Using 2 strands of thread 2, fill in the areas marked 2 with silk stitch. The direction of your stitches should be vertical
Step three: Take a piece of thread 1 will all six strands. Separate out one single strand and thread your needle with it. Use this single strand to couch the group of 5 remaining strands to form the outline of the toadstool cap. Do not outline the sections filled with French Knots from step one
Step four: Using 2 strands of thread 4, fill in the area marked 3 with vertical brick stitch filling
Step five: Using 2 strands of thread 3, add a staggered row of vertical straight stitches to the top of the stalk. These stitches will overlap the top of the brick stitch filling

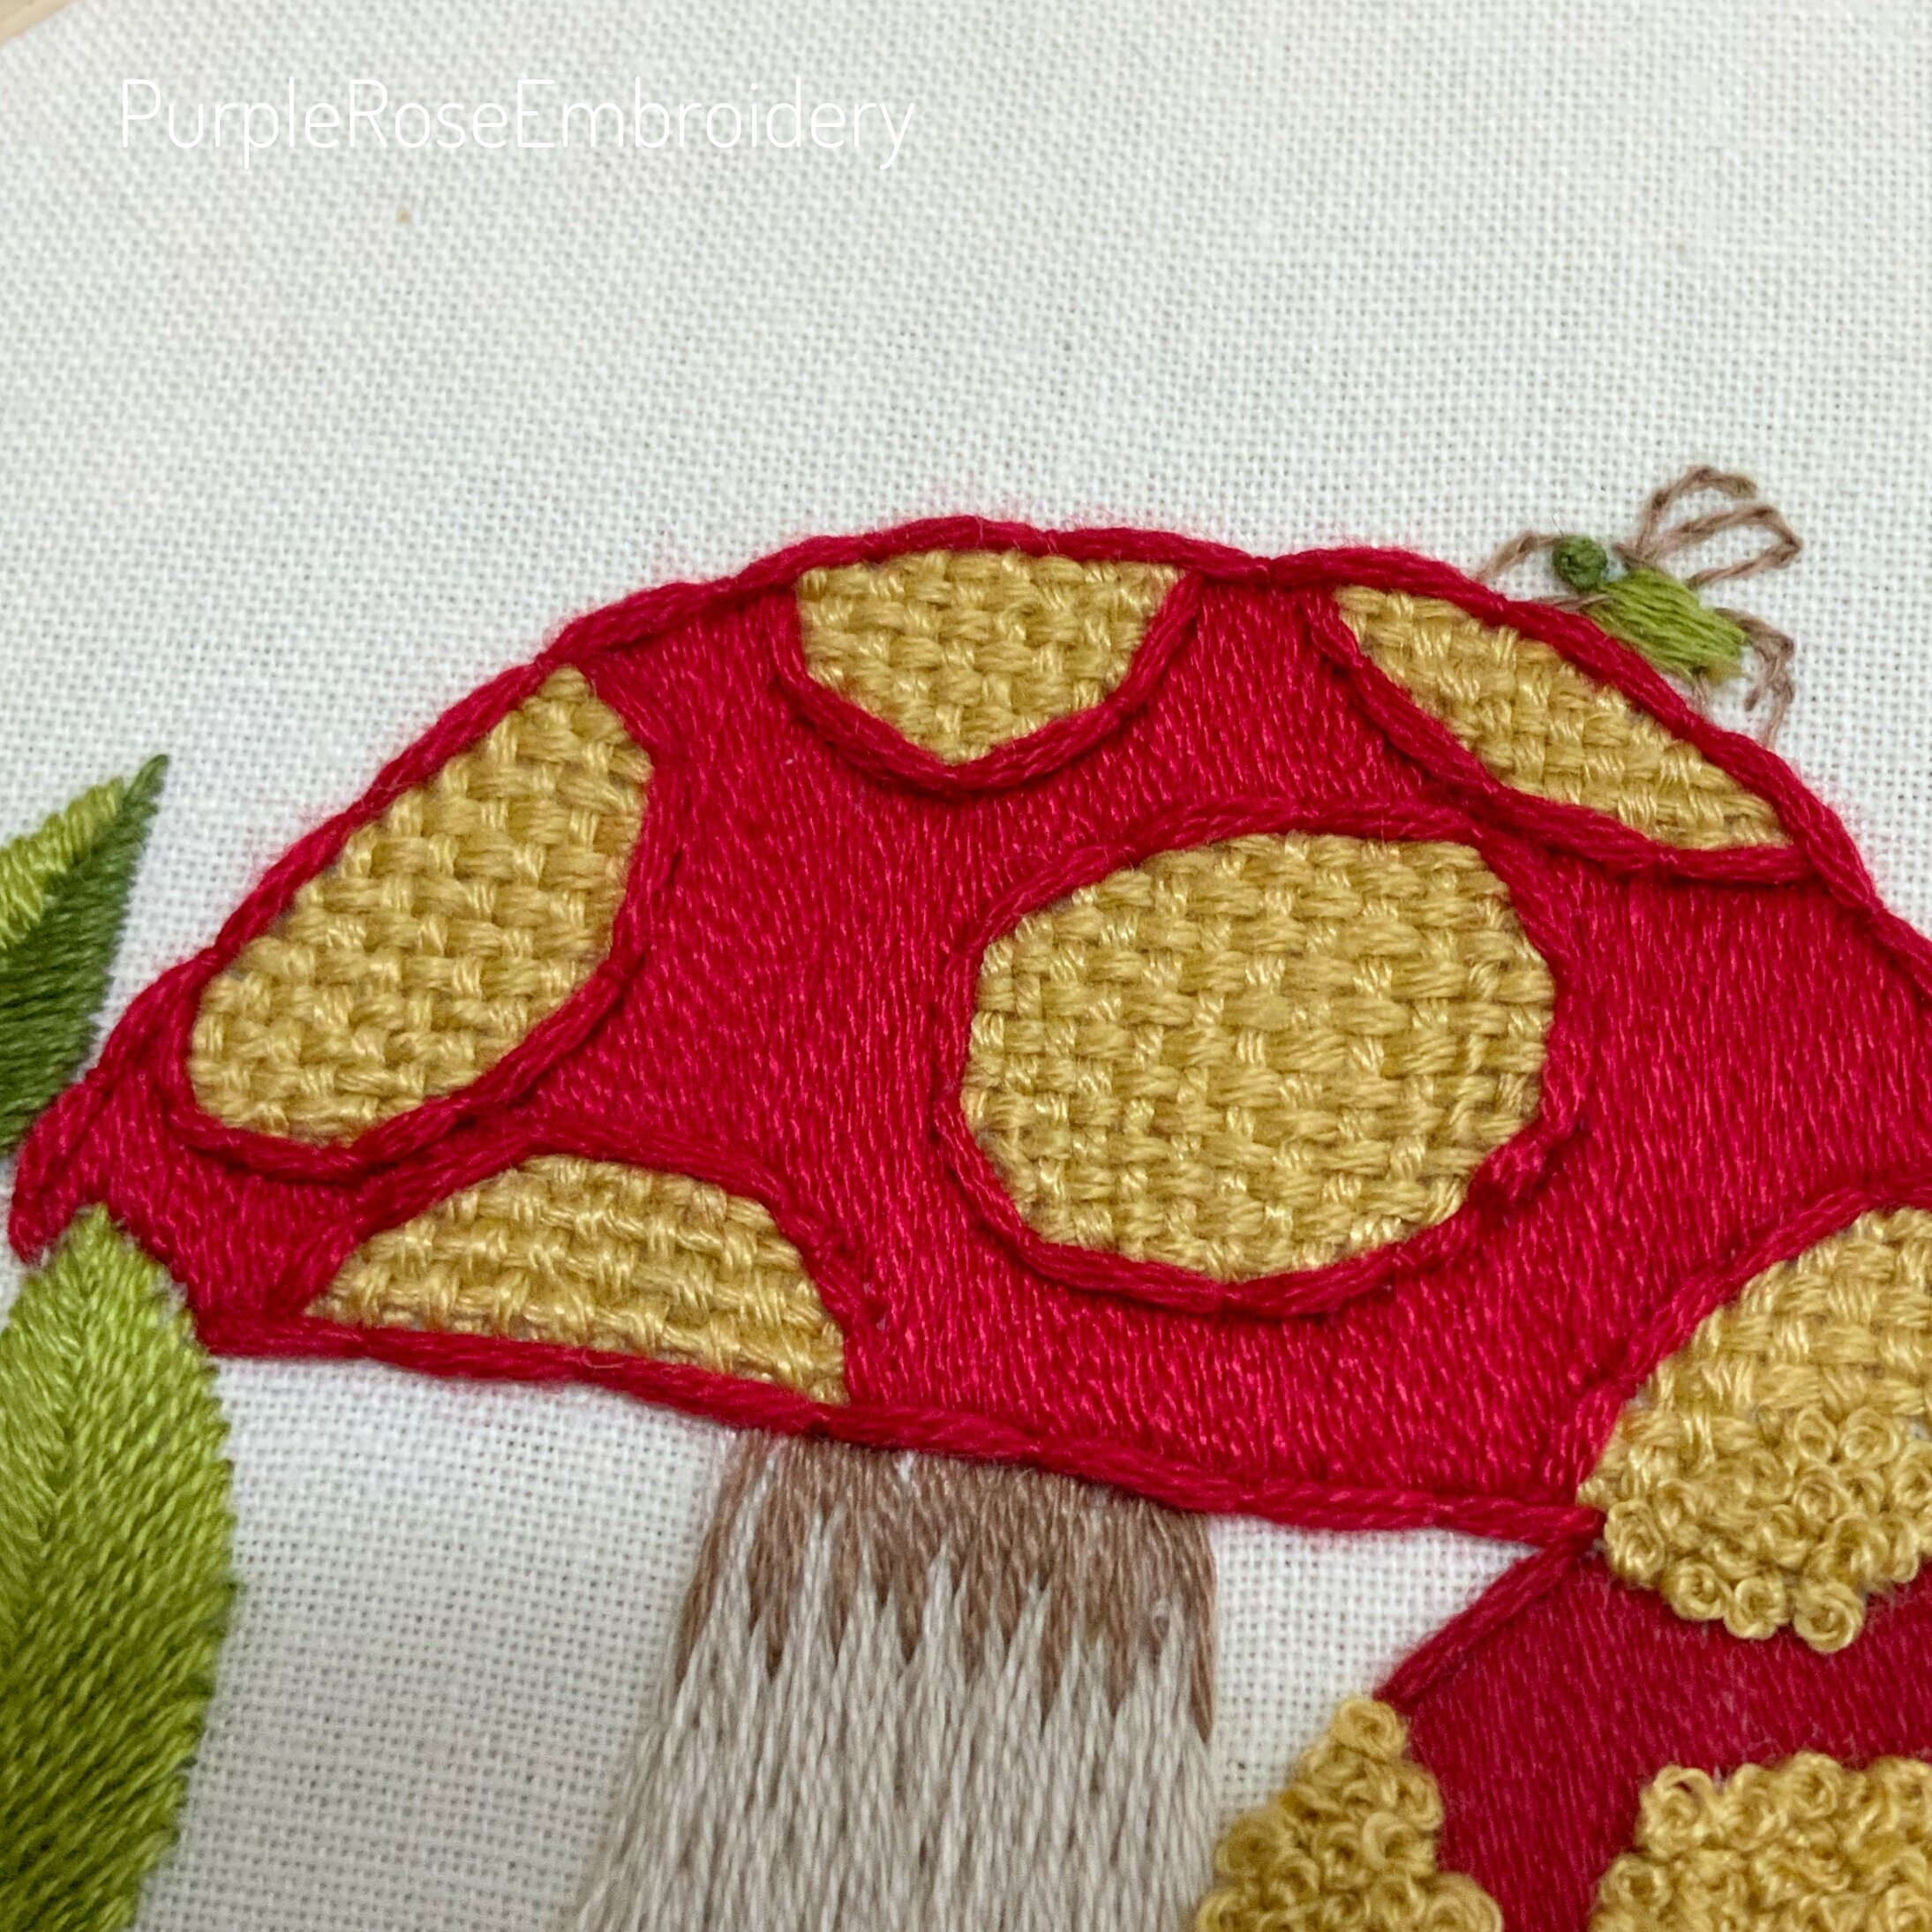
The Large Toadstool
Step one: Using 3 strands of thread 5, fill in the areas marked 4 with woven filling. Use a blunt needle for this to help you slide under your stitches without snagging them
Step two: Using 2 strands of thread 2, fill the area marked 5 with silk stitch. The direction of your stitches should be vertical
Step three: Take a piece of thread 1 will all six strands. Separate out one single strand and thread your needle with it. Use this single strand to couch the group of 5 remaining strands to form the outline of the toadstool cap. Also outline each area of woven filling from step one
Step four: Using 2 strands of thread 4, fill area 6 with long and short stitch. The direction of your stitches should be vertical at the top and should fan out towards the bottom of the stalk. I recommend stitching this area from the top down
Long and Short Stitch Tutorial
Step five:
Using 2 strands of thread 3 add a staggered row of vertical straight stitches to the top of the stalk, overlapping your existing stitching from the previous step
The Leaves
Step one: Using 2 strands of thread 3, chain stitch the stalks for the leaves
Step two: Using 2 strands of thread 6, silk stitch the half leaf areas marked 7. Make sure that the direction of your stitches is diagonal from the middle of the leaf outwards and leaning towards the tip
Step three: Using 2 strands of thread 7, silk stitch the half leaf areas marked 8. The direction of your stitches should be a mirror image of those from the previous step so each leaf has the stitches meeting in the middle and forming a ‘v’ shape
Step four: Using 2 strands of thread 6, fill any full leaf areas marked 7 in fishbone stitch
Step five: Using 2 strands of thread 7, fill any full leaf areas marked 8 in fishbone stitch

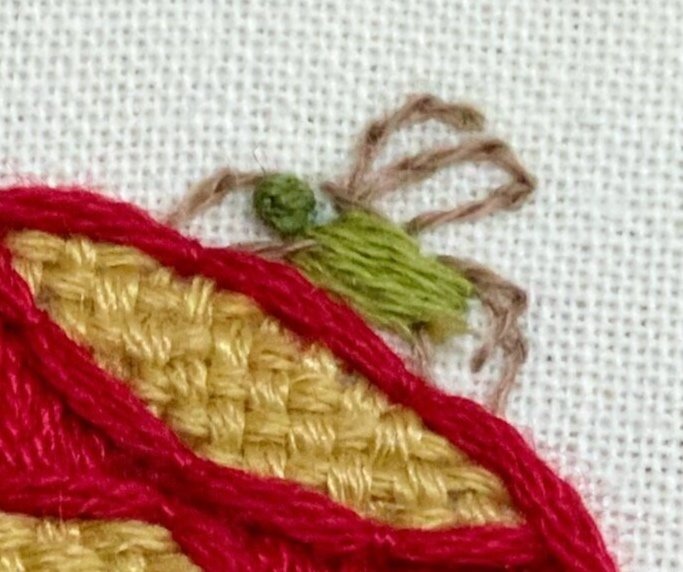
The Insect
Step one: Using 2 strands of thread 6, silk stitch the body. The direction of your stitches should be horizontal across the insect
Step two: Using 2 strands of thread 7, add a single French Knot for the head
Step three: Using 1 strand of thread 3, outline the wings and legs in split stitch
I hope you enjoyed stitching this fun little sampler! Keep your eyes peeled for next month’s free pattern… rumour has it, it might be blackwork!